
Cutting the Cord on Your TAZ
Cutting the Cord . . . .
Remote Printing & Monitoring with Octoprint
Shopping List
- Raspberry Pi (low powered, headless, all-in-one box)
- Case
- Power supply
- Micro SD card
https://www.amazon.ca/LANDZO-Raspberry-Completed-Kits/dp/B01IOVOQ38
Download Software
- Latest OctoPi image: http://octoprint.org/download/
- Etcher tool to burn images to SD cards: https://etcher.io/
- PuTTY for SSH connections: http://www.putty.org/
Install Octopi Image
- Using a computer with an attached SD card reader, unzip the downloaded OctoPi image.
- Instal and launch Etcher.

- Select the unzipped OctoPi image and the SD card you would like to install it on. Click Flash! and wait for the image to be written and validated on the card. This may take several minutes to complete.
- Navigate to the root of the SD card, and using your preferred text editor, open the file named optopi-network.txt.
- Configure WiFi access by configuring the file with your own network settings and uncomment the appropriate lines by removing the '#' in front of the line. If you prefer a static IP address, insert that section before the SSID and password settings.


Start Octopi
- Boot the Pi with the SD card inserted.
- Log into your Pi via SSH using a program such as PuTTY. If your computer has the Bonjour service installed, you can reach the Pi using the address http://octopi.local, otherwise supply the IP address you assigned to it earlier n the optopi-network.txt file. (Since the SSL certificate is self signed, and generated upon first boot, you will get a certificate warning which you can accept by clicking Yes).

- After clicking Open, sign into the session using the default username is "pi" and default password "raspberry". Change the password using the passwd command. When you type the passwords, nothing will be displayed for security reasons.

- You can now close the session by typing exit.
- To connect to the web gui of octopi, now open a web browser. In the address bar, enter the IP address of the Pi. (If your computer supports the Bonjour service, you can also use either http://octopi.local or https://octopi.local).
- If a USB webcam or the Raspberry Pi camera is detected, MJPG-streamer will be started automatically as webcam server. OctoPrint on OctoPi ships with correctly configured stream and snapshot URLs pointing at it. If necessary, you can reach it under http://octopi.local/webcam/?action=stream and SSL respectively, or directly on its configured port 8080: http://octopi.local:8080/?action=stream.


Configure Octopi
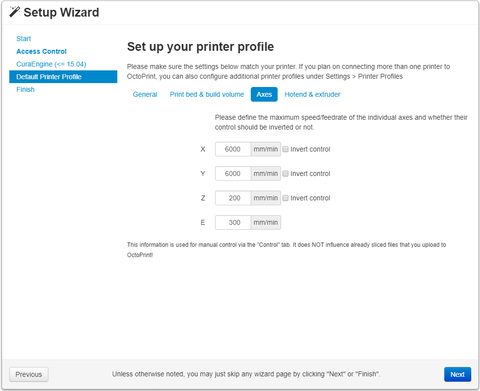
- The first time you access Octopi through the browser, you be greeted with a setup wizard.

- It is strongly recommended to enable Access Control, so create a username and a password, then click Keep Access Control Enabled.

- Next, you can import a slicing profile for each printer you intend to use the Octopi with. Alternatively, you can also manually confirgure the CuraEngine profile. Check out these standard profiles that you can download and make use of.

- Once a profile is created, you can process to configure the details of it including print bed, acceleration, and nozzle size.


- Reload the user interface to apply all of the changes.
- Congratulations! You now have a working copy of OctoPrint to control your printer!